Posts

Image
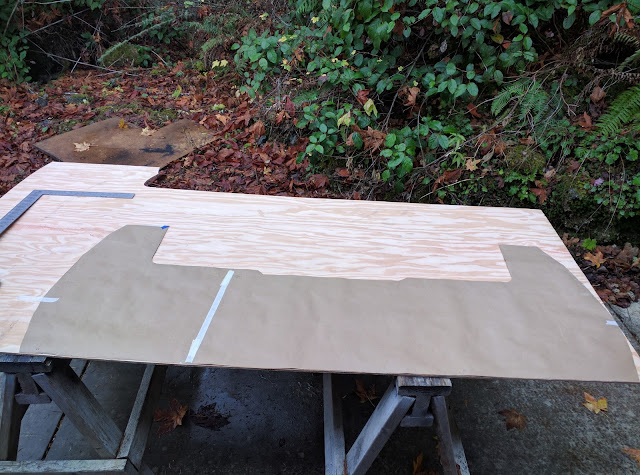
Transom III The new transom, with symmetrical cut-out and holes drilled for motor mount. Since the last post I bonded layers 3 and 4 to the transom! The 3 rd was ¼”, and just slid in behind the shoulder at the aftermost part of the center rib with a gap a bit less than ⅛”. The third ply in place. I later thoroughly filled the gap with GelMagic. The 4 th  and last was the  ½ “ thick plywood, which I cut out to accommodate the knee. I took special care to shape the edges so they fit flush to the curvature of the hull. For this I used a grinder with a 60-grit flapper wheel; it's easy to control and and quickly removes material. Shaping the edge of the last ply. To measure the amount of material to grind off I used a straight edge on a scrap of the appropriate size plywood, and measured the distance between the previous ply and the hull every three vertical inches. With the previous ply template laid on the plywood to be cut, I just added these measurements...
Image
TRANSOM II With all the old wood and poorly bonded fiberglass mat removed from the forward side of the transom, the process of building it back up has begun. Templates were made and used to cut the plywood, starting with a piece of ¼” A-C. If you are not familiar with plywood grades, “A” refers to a veneer with no knots (or knots that are patched) and “C” grade has some knots and voids. So, A-C is knot-free on one side and has some knots and cracks on the other. It’s my understanding that nearly all plywood these days uses waterproof glue, but be sure to check (the sign at Lowes said it did). Template on ¼” plywood The transom needs to be at least 1- ⅝"  thick to accommodate most high-horsepower motors. I bought sheets of ¼ and  ½ ” plywood (it's labeled as 15/32); any thicker than this might be hard to bend to conform to the curvature of the transom. Unless the deck has been removed, the plywood needs to be cut to get it into the hull. The joints need to be stagg...
Image
SPLASH WELL BULKHEAD One of the previous owners cut out the lower portion of the bulkhead between the cockpit and the transom, then covered it with a removable canvas flap. Cut-out in splash well bulkhead (looking aft from cockpit) I can see this would be an improvement if you were in big seas and taking on water, where the cockpit could drain directly into the bilge below the splash-well shelf.  As you saw in the last posting, whoever did that failed to seal the plywood in the  lower bulkhead, which led to the rot. There was a bilge pump back there when I got the boat, and considering that it used to be in Brookings there were likely excursions into rough water. In my quest for originality, I’ve elected to fill in that area and restore the quaint hatch that accesses the aftermost bilge. I plan to use this boat in our calm inland seas, so won’t be bounding over waves and taking green water over the bow. I cut an insert out of ¼” A-C plywood and installed it by wedgin...
Image
TACKLING THE TRANSOM, Part 1 Obviously, a sound transom is a good feature in an outboard motorboat! Even well cared-for boats can have transom issues. Considering that Skagit boats are about 60 years old, I'm guessing that most of them either need or have had a transom replacement. During manufacture, the 1-1/8" fir plywood that made up the structure of the transom was bonded to the fiberglass shell before the deck was installed, using chopped strand mat saturated with polyester resin. I don't know how the top was sealed; I assume with fiberglass cloth, but there is no remnant of that on my boat. Removing the Rot The previous owner had begun removing the plywood from the fiberglass shell before I bought it, so I removed the rest by cutting through it with a circular saw where I could, then chiseling the rest off. The previously mentioned mat between the plywood and molded transom was not well-bonded in some areas, so I tediously removed that with a chisel...
Image
COMING HOME Our seven acres on Fidalgo Island sounds spacious, but it only has two fairly level areas with the rest being steep and cliffy. It took some effort to prepare a pad for the Offshore, and I took the opportunity to also re-gravel and grade our 1/4-mile driveway. Here is where she sits now. I've added extensions to the stock Costco enclosure so the windshield would clear, and installed the side curtains after this picture was taken. There's an electrical drop nearby, as well as water, so although it's in the woods we have all the amenities (the toilet is out the back). A big drawback is that I have to back up our steep driveway, which we call the Long and Winding Road (the Beatles last #1 hit, for those of you who are not Baby Boomers). During the summer it will probably stay at a nearby storage yard, or maybe the dry storage facility on the Swinomish Channel. Once we got it in, I elevated the trailer tongue to get as much water as possible out of the h...
Image
PROLOGUE Ever since I saw Tim Jones' Skagit Saratogan in 2011 at Blind Bay (Shaw Island, in the San Juan Islands of NW Washington State), I've been interested in the boats made by Skagit Plastics, a company based in La Conner, WA. They produced a variety of models from 1954 to 1961. Skagit 31' Saratogan, owned by Tim Jones The funny thing is, I hadn't been drawn to motor boats until I saw Tim's and did a little research on Skagits. My passion is sailing, and I've been actively racing and cruising sailboats for 25 years. There's just something about the look of these boats that appeals to me. A brief history of the company can be found here . I had been very casually searching for Skagit boats on Craigslist for the last six years. Given that they are around 60 years old, a surprising number survive and are occasionally offered for sale. I wanted a project, but most of them were either restored or badly deteriorated. In August 2017 a local guy very k...